Mostly all offices block Gmail Website to increase employee productivity. Hence it becomes really difficult for people to keep a track of their Gmail email accounts in offices. I was also facing the same problem and later I came up with a solution that is auto forwarding.
If you select this option then all your gmail emails will be auto forwarded to some other mailing account (for e.g. Official Email Id) and it makes possible for you to keep a track of your Gmail even during office hours. So, today I am going to let you know how to auto forward in gmail.
Steps to Auto Forward in Gmail:
Please follow below steps for Auto Forwarding Mails from Gmail Account:
- First of all, login to your Gmail account.
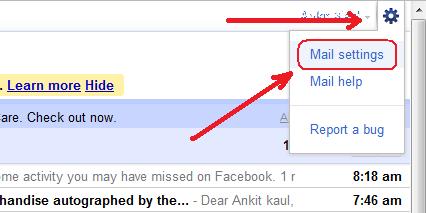
- Click the gear icon in the top right side.

- Select the “Mail Settings” option.
- Now Navigate to Forwarding and POP/IMAP tab.

- Click the button that says “Add a Forwarding Address”.
- Enter the email address to which you’d like your messages forwarded.

- Now a mail will be sent to the mail id which you have just entered (forwarding email) and you have to login to that account and click the confirmation link in the mail sent from Gmail team.
- If the confirmation link is not working then alternatively you can also copy the confirmation code and paste it in the “confirmation code” textbox and click the verify button.
- Back in your Gmail account, select the ‘Forward a copy of incoming mail to…’ radio button and select your forwarding address from the drop-down menu.
- Click the Save Changes button and you have successfully applied an auto forward in your Gmail.
Now all of your Gmail emails will be forwarded to the other email id. So, this was how to auto forward from gmail.
Stay connected for more. ![]()
?ed the ABOVE POST, THEN GO A STEP FURTHER AND SHARE IT WITH YOUR FRIENDS!!

Comments on this entry are closed.