I think I am not the only person, who wants to use his keyboard for all kind of odd jobs. Today I am going to share a nice trick that can help you to create tables in Microsoft Office or Outlook without using your mouse. Ya, I know it sounds a bit crazy to create tables without using mouse in Microsoft Office but I am writing this for those people who are like me and do most of the things with the keyboard itself instead of using mouse at all.
How to Create Table without using mouse and menus:
So here we go, please use below listed steps to do this:
- Open the Microsoft Office Document or a new mail in Outlook where you want to create table.
- Now in the document type (+——+——+——+) without brackets.
- After this hit Enter key.
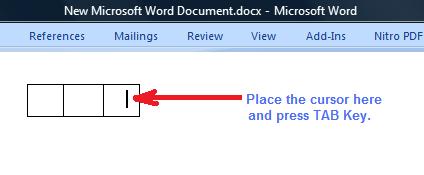
- Now you have created first row in the table. In this row place the cursor in the last cell (as shown in the image) and hit tab key to add more rows.

- After pressing the “tab” key a new row will be added below the current row.
- One more thing I would like to make very clear is that after adding the row, the cell width will get auto increased as you write inside it.
This was all about creating tables in Microsoft Office and Outlook using just your keyboard.
Bonus Tip: I would also like to give you a bonus tip to use above trick in many different ways. As you would have observed that we just entered (+——+——+——+) to create the table.
Actually in the above trick ‘ + ‘ represents the column borders and ‘ – ‘ represents the length of the each column. So you can easily increase the column length as you write.
Please drop in your feedback or queries in the comments section below. If you have come across any other such tip to create table then do share it with us.
Cheers!
?ed the ABOVE POST, THEN GO A STEP FURTHER AND SHARE IT WITH YOUR FRIENDS!!

Comments on this entry are closed.